netlify는 git push하면 자동으로 publish하므로 공개도메인의 static html이 변경이 됩니다. 공개 api도 그렇게 할 수 있을까요?
네 가능합니다. 다만, 무료로 사용할 수 있는 vm이 없기 때문에 비용이 발생할 수도 있습니다. (아마도 goorm container를 이용한 방법은 가능하리라고 생각합니다만)
이번에는 deploy 자동화 뿐만 아니라, gitlab CI/CD를 이용해서 unittest-deploy-apitest까지 이어지는 상당히 레어한 설정(.gitlab-ci.yml)을 보여드리겠습니다.
github이 상당히 더 풍부한 기능을 지원하고 있지만 gitlab을 사용하는 이유는, 회사에서 사용하고 있는 로컬 레포지토리로 gitlab을 사용하고 있기 때문인데, github은 후에 다시 한 번 다루어 볼 예정입니다.
프로젝트
우선 프로젝트를 만듭니다.
gitlab에 gitlab-cd-private-api 라는 이름의 프로젝트를 만듭니다.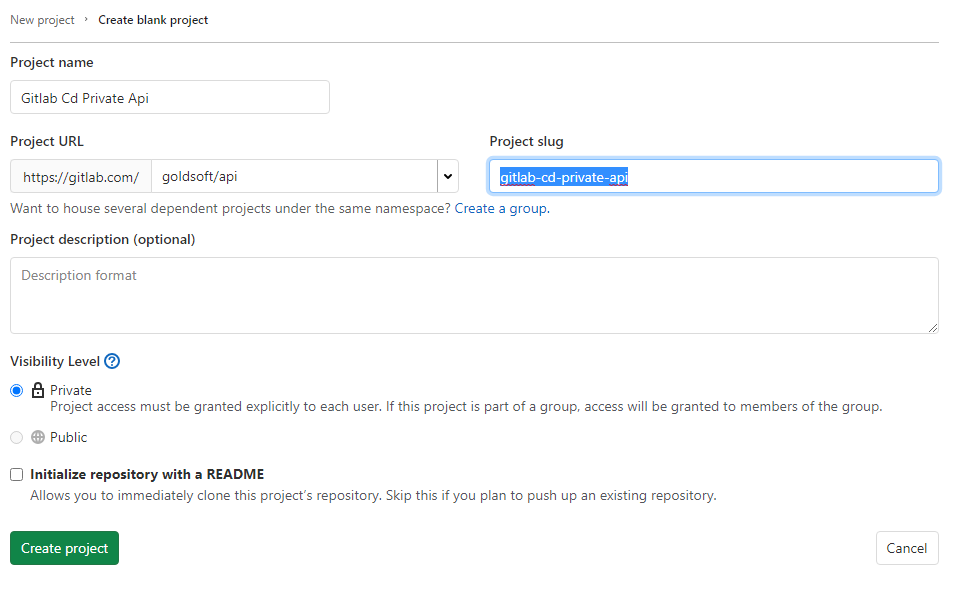
파일은 read me만 있어도 괜찮습니다. local에서 push했을 때, api 머신에 자동으로 다운받게 하려는 것이 목적입니다.
push된 코드가 자동으로 설치될 api 머신에는 gitlab-runner를 설치합니다.
gitlab-runner
요즘은 테스트용 VM을 만들면, 그냥 습관적으로 gitlab-runner를 설치하곤 합니다.
사실, gitlab-runner는 scoop으로도 설치할 수 있습니다. scoop search 해보면 최신버전의 gitlab-runner가 표시됩니다.
PS C:\goldsoft\gitlab-cd-private-api> scoop search gitlab-runner
'main' bucket:
    gitlab-runner (13.8.0)
하지만, 회사의 로컬에 운영하는 버전과 맞지 않으면 곤란합니다. 사실 versions 라고 하는 scoop bucket이 있기 때문에 맞는 버전을 scoop에서 받을 수도 있습니다만, 그냥 다음의 공식 페이지에서 다운받는 것이 좋습니다.
- https://docs.gitlab.com/runner/install/
windows VM이면 windows를 선택하시면 됩니다.
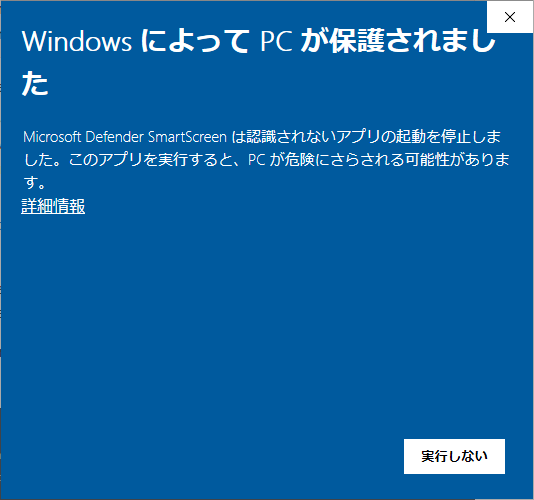
파일의 속성중에 다음과 같은 속성이 있으면 체크해 주면 됩니다.
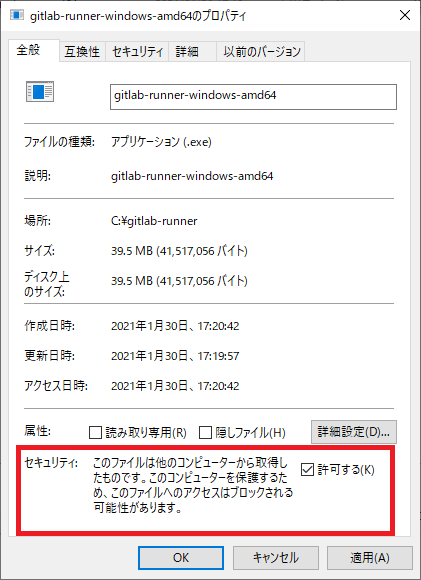
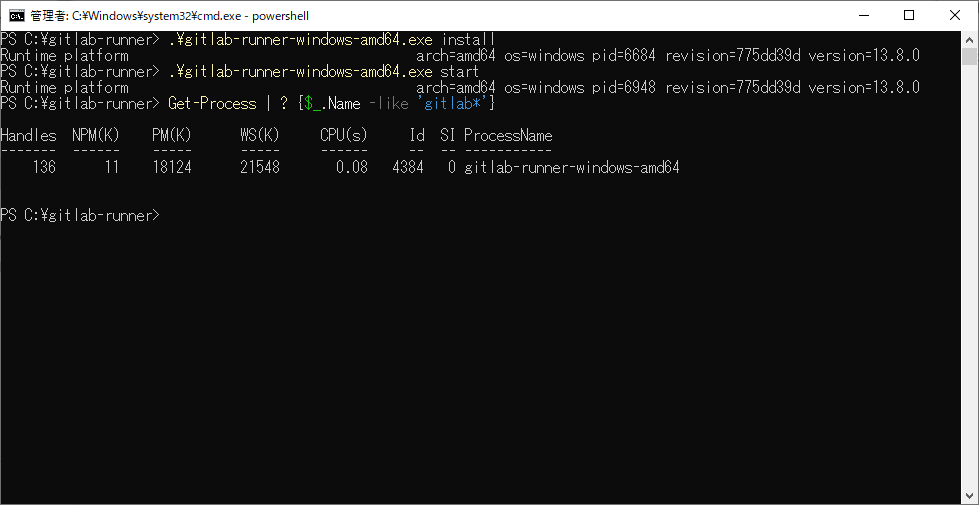
설치한 디렉토리는 gitlab 문서에 있는 것처럼 C:\GitLab-Runner를 사용했습니다. 실행한 내용은 이렇습니다.
cd C:\GitLab-Runner
.\gitlab-runner.exe install
.\gitlab-runner.exe start
gitlab-runner.exe install을 해두면 서비스로 등록되기 때문에, VM을 재기동을 해도 실행되어 있습니다.
config.toml
현재 gitlab-runner.exe가 있는 디렉토리에는 config.toml파일이 있을 텐데, 내용은 기본적인 내용으로 다음의 내용만 존재합니다.
| |
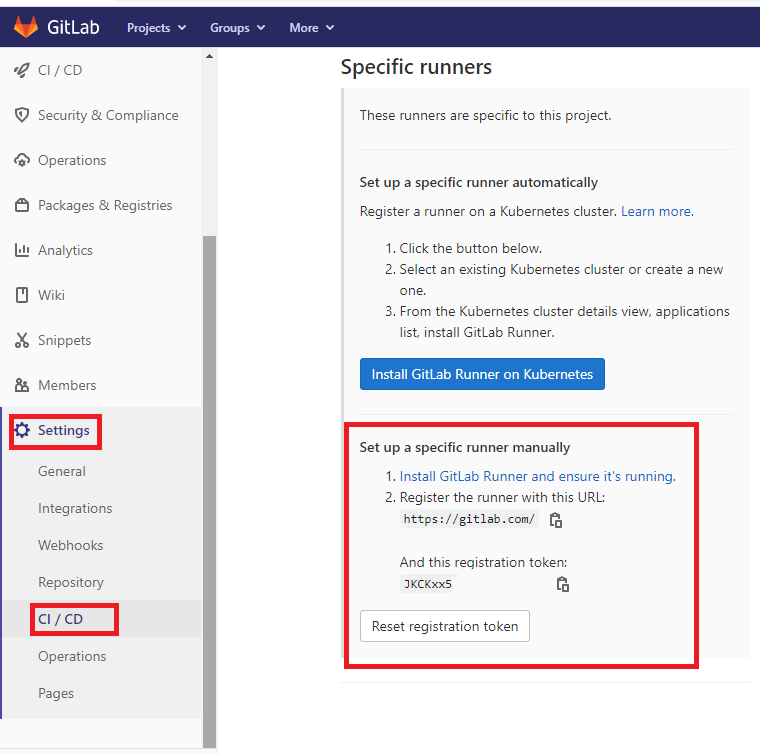
prompt에서 gitlab-runner.exe 의 register 명령을 이용하여 필요한 내용을 입력하면 config.toml이 갱신됩니다.register 명령을 실행할 때, 중요한 파라메터가 url과 registration token입니다. 여기는 gitlab.com 페이지에서 제공하는 문자열을 사용하셔야 합니다. 사내 gitlab에서는 다른 url이 주어지고 있습니다.
PS C:\gitlab-runner> .\gitlab-runner-windows-amd64.exe register
Runtime platform arch=amd64 os=windows pid=7256 revision=775dd39d version=13.8.0
Enter the GitLab instance URL (for example, https://gitlab.com/):
https://gitlab.com/
Enter the registration token:
JKCKxx5sX_**********
Enter a description for the runner:
[SDC205086061]: 여기는 그냥 호스트이름이 주어집니다.
Enter tags for the runner (comma-separated):
Registering runner... succeeded runner=JKCKxx5s
Enter an executor: shell, ssh, virtualbox, docker+machine, docker-ssh+machine, docker-ssh, parallels, docker-windows, kubernetes, custom, docker:
shell
Runner registered successfully. Feel free to start it, but if it's running already the config should be automatically reloaded!
PS C:\gitlab-runner> dir
ディレクトリ: C:\gitlab-runner
Mode LastWriteTime Length Name
---- ------------- ------ ----
-a---- 2021/01/30 18:38 602 config.toml
-a---- 2021/01/30 17:19 41517056 gitlab-runner-windows-amd64.exe
PS C:\gitlab-runner> cat config.toml
concurrent = 1
check_interval = 0

[session_server]
  session_timeout = 1800
[[runners]]
name = "SDC205086061"
url = "https://gitlab.com/"
token = "gyzz-w4yea-*********"
executor = "shell"
shell = "powershell"
[runners.custom_build_dir]
[runners.cache]
[runners.cache.s3]
[runners.cache.gcs]
[runners.cache.azure]
PS C:\gitlab-runner>
config.toml의 상세한 내용까지 지정하려면 많은 부분을 읽어야 하는데, 다음을 참조하시면 됩니다. 공식문서는 여기를 입니다.
좀 더 간단히 하고 싶다면 non-interactive 한 방법도 있습니다.
.gitlab-runner.exe register --non-interactive --url https://<GitLab-URL> --registration-token <TOKEN> --executor shell --locked=false
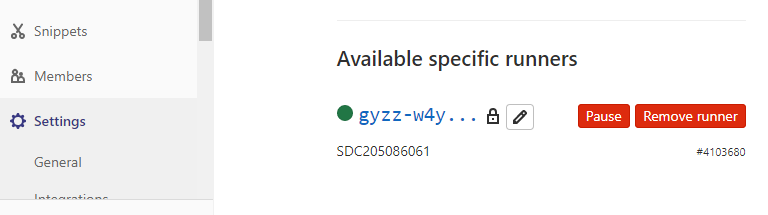
다음과 같이 gitlab 화면에서 available specific runners에 설정한 컴퓨터의 정보가 나오면 잘 하신 겁니다.
이제는 프로젝트에 .gitlab-ci.yml 파일을 등록하셔야 합니다. 여기서는 yaml 파일 형식을 사용합니다.
.gitlab-ci.yml 구성요소
.gitlab-ci.yml을 구성하는 Stage? Job? PipeLine? 과 같은 요소들을 먼저 이해하고 yml의 내용을 구성하셔야 합니다.
먼저 gitlab이 보여주는 완성된 pipeline의 이미지를 보시고 구성요소들을 보시면 이해하기 쉽습니다. 우리가 만들 yml 파일로 수행될 job들은 최종적으로 gitlab에서 다음과 같은 모습으로 보이게 됩니다.
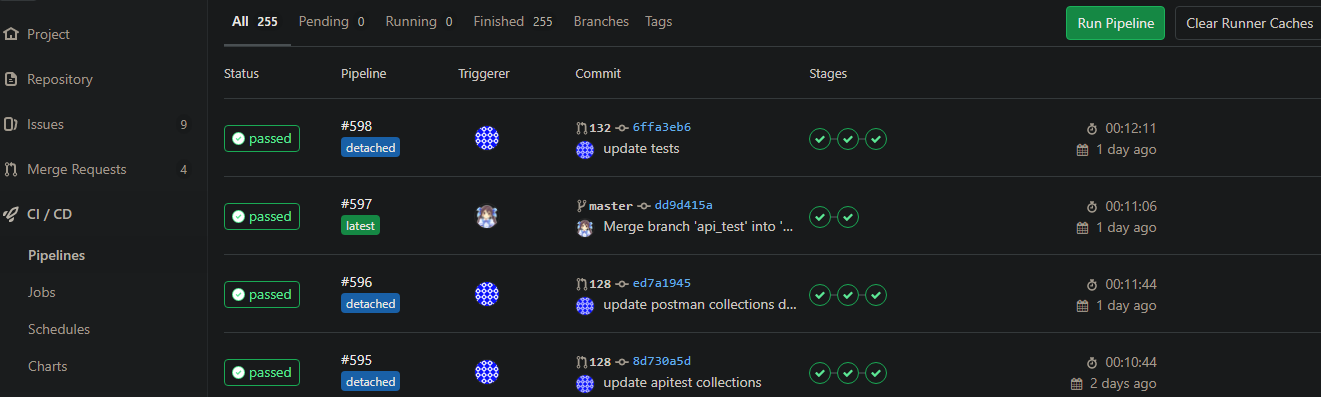
위의 이미지의 리스트에는 MR이 왔을 때의 PipeLine과 Master에 Merge했을 때의 PipeLine이 섞여 있습니다. 구분하실 수 있으신가요?
네 첫번째 줄이 MR이 왔을 때의 PipeLine, 두번째의 줄이 Master에 Merge했을 때의 PileLine입니다. 자세히 보면 숫자 앞의 아이콘이 다릅니다. 이 아이콘으로 구분하시면 됩니다. 그리고 stage에 있는 체크 동그라미의 갯수가 다릅니다.
MR이 왔을때의 PipeLine
이때는 stage 동그라미가 3개 입니다. 파이프라인의 번호 #598 을 클릭해 내용을 보면 다음과 같습니다.

stage는 3개입니다. Test stage에 Job이 1개 Deploy stage에 job이 2개, APITest에 Job이 1개입니다.
Master에 Merge했을 때의 PileLine
이때는 stage 동그라미가 2개 입니다. 파이프라인의 번호 #597 을 클릭해 내용을 보면 다음과 같습니다.
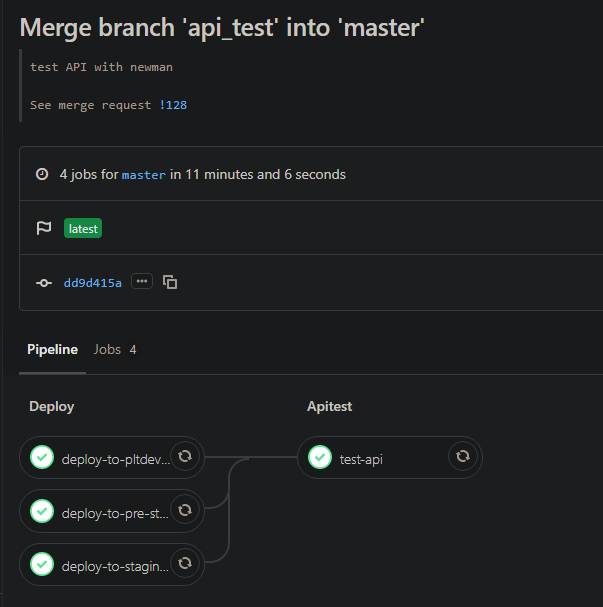
stage는 두개입니다만, Deploy stage에 job이 3개, APITest에 Job이 1개입니다.
감이 오시죠? 이와 같은 수행을 하는 .gitlab-ci.yml 을 작성해 보면 다음과 같습니다.
.gitlab-ci.yml 샘플
이 샘플파일은 powershell의 모듈 프로젝트의 gitlab의 ci yaml파일, pester를 이용한 unittest, newman을 이용한 apitest를 포함하고 있습니다. 쉽게 볼수 있는 설정파일은 아닙니다. 상당히 레어 아이템에 가깝습니다.
| |
stages
먼저 stage를 정의합니다. 정의된 만큼, 또 순서대로, 각각의 stage에 속한 job들을 실행합니다.
job
이 yaml파일의 최상위 속성, 예를 들면 test_job:나 deploy-to-staging-server: 과 같은 속성은 job을 나타냅니다.
ref
각각의 job들이 어느 때 실행되어져야 하는 지, MR이 왔을 때 실행되어야 하는 지, Master에 Merge되었을 때 실행되어야 하는 지, schedule 되었을 때 실행되어져야 하는 지 설정하는 속성은 refs입니다.
except
이도 중요한 설정입니다. md파일이 변경되거나 txt파일이 변경되거나, 로직에 변화를 주지 않는 파일이 변경된 경우 등, 해당 job을 수행할 필요가 없는 경우는 여기에 그 내용을 기록합니다.
tag
tag는 gitlab-runner 서버의 태그이름입니다. 어떤 서버에서 실행되어져야 할 지를 지정합니다.
script
여기가 prompt에서 실행되는 코드입니다. config.toml에서 shell = "powershell" 로 지정했기 때문에 라인 하나하나가 powershell 코드입니다.
다음과 같은 형태의 모습을 하고 있습니다.
- ‘Import-Module Pester’
- ‘Invoke-Pester -Configuration $config’
- powershell.exe -file .\deploy.ps1 pre-staging -ErrorAction Stop
특이한 점은 newman script를 실행하는 점인데, newman은 nodejs로 움직이는 프로그램입니다. 그리고 gitlab-runner 서버에서 스크립트가 실행되는 디렉토리는 gitlab-runner.exe가 있는 디렉토리이므로, 그 디렉토리에 newman을 설치해야 newman이 실행됩니다. 결국은 gitlab-runner디렉토리는 이러한 모습이 됩니다.
PS C:\> cd .\GitLab-Runner

PS C:\GitLab-Runner> dir


    ディレクトリ: C:\GitLab-Runner


Mode                LastWriteTime         Length Name
----                -------------         ------ ----
d-----       2021/01/27     17:13                builds
d-----       2021/01/27     17:51                node_modules
-a----       2021/01/27     17:06            344 config.toml
-a----       2021/01/27     17:00       41517056 gitlab-runner.exe
-a----       2021/01/27     17:51         100786 package-lock.json
-a----       2021/01/27     17:51             51 package.json
master push할 때 deploy만 필요한 경우
이번은 unittest없이 apitest없이 그냥 재재배포만 하는 경우에 해당하므로 심플한 형태의 샘플을 작성하면 다음과 같습니다.
| |
gitlab-runner는 실행할 때, 환경변수 PATH를 재 설정하는데, scoop 으로 git을 설치한 경우는 문제가 있을 수 있습니다.
해결 방법은 두가지 인데
- git을 삭제하고 git을 다시 시스템 디렉토리인 c:\Program Files… 에 설치하는 방법과
- .gitlab-ci.yaml 안에 환경변수로 Path을 다시 넣어 설정하는 방법이 있습니다.
deploy.ps1
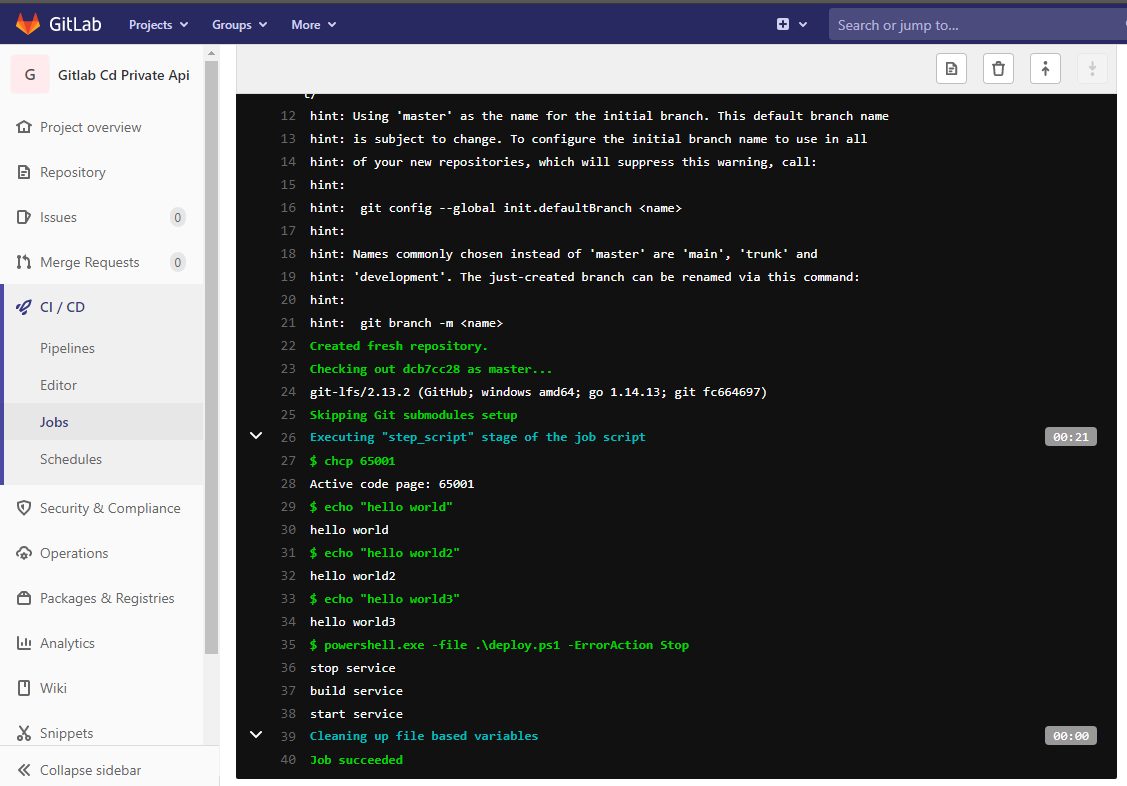
설제로는 서비스를 정지시키고, 빌드하고, 다시 스타트 해야겠습니다만, 임시로 다음과 같은 내용으로 deploy.ps1을 정의 했습니다.
| |
최종적으로 실행된 job 모습은 다음과 같습니다.
테스트 서버가 아닌 local에서 테스트
테스트 서버가 아닌 local에서 테스트하고 싶은 경우에는 로컬에 gitlab-runner를 설치하고 프로젝트 디렉토리에서 (.git 폴더가 있는 디렉토리에서) 다음의 명령으로 CI/CD를 테스트 할 수 있습니다.
C:\Gitlab-Runner\gitlab-runner-windows-amd64.exe exec shell test
그 외에도 몇몇 경우에 빌드가 꼬이거나, 디렉토리가 꼬이거나 권한이 꼬이거나, gitlab서버거 재시작되어 ssh의 finger-print가 안맞거나 여러가지 문제가 발생할 수 있습니다. 각각의 해결 방법에 대해서는 공식 문서를 참조해서 해결해야 합니다.
이상으로 .gitlab-ci.yml 을 이용하여 git push하면 자동으로 무언가가 실행되도록 해보았습니다.
gitlab-runner를 이용하면 좀 더 다양한 것들이 가능할 수도 있습니다. 예를 들면
- netlify처럼 static html을 올리는 것도 가능하구요
- gitlab-runner server에서 자동으로 slack이나 chatwork를 전송하는 방법
- gitlab-runner server에서 자동으로 mdbook 으로 pdf를 생성하게 하는 방법
그 외에도 생각할 수 있는 여러가자의 것이 가능할 듯 합니다.