자기 인증서 만들기
gnu의 openssl은
- key 만들고,
- 여기에 여러 정보(subject)를 넣어서 소스 파일(scr) 만들고
- 인증서(crt) 만들어서
저장소(store)에 저장하는 것이 일반적입니다만, 윈도우즈의 표준 PKI 모듈에 있는 명령어는 이것을 한 번에 끝냅니다. 즉 New-SelfSignedCertificate과 같은 명령은 바로 crt를 만들어서 store에 저장해 줍니다.
하지만, rsa 키를 만들려면 다른 모듈을 사용해야 합니다. Carbon이라는 모듈에 New-RsaKeyPair 라는 커맨드가 있습니다.
 1
 2
 3
 4
 5
 6
 7
 8
 9
10
11
12
13
14
15
16
17
18
19
20
21
22
23
| Set-ExecutionPolicy -ExecutionPolicy Unrestricted -Force
Install-Module Carbon -Force -AllowClobber
Import-Module Carbon -Prefix C -PassThru
PS C:\Users\Administrator> New-CRsaKeyPair
コマンド パイプライン位置 1 のコマンドレット New-CRsaKeyPair
次のパラメーターに値を指定してください:
Subject: CN=tkim.info
PublicKeyFile: public.key
PrivateKeyFile: private.key
Enter private key password: *********
ディレクトリ: C:\Users\Administrator
Mode LastWriteTime Length Name
---- ------------- ------ ----
-a---- 2020/09/27 20:18 1942 public.key
-a---- 2020/09/27 20:18 4229 private.key
PS C:\Users\Administrator>
|
그러나 New-RsaKeyPair 를 쓰는 것과, openssl을 쓰는 것을 비교한다면??
다른 옵션으로는 저장소에 만들어진 인증서에서 뽑아내야 합니다.
1
2
| Export-PfxCertificate -FilePath $privateKey -Cert $cert -Password $pwd
Export-Certificate -FilePath $publicKey -Cert $cert
|
순서가 openssl과 반대죠?
일단 표준 모듈(PKI)의 사용으로 넘어가 보죠.
DNS지정해서 만들기
1
2
| New-SelfSignedCertificate -DnsName "www.fabrikam.com", "www.contoso.com" `
-CertStoreLocation "cert:\LocalMachine\My"
|
- Subject 와 Issuer 는 “www.fabrikam.com"이 됩니다.
- -DnsName을 지정해 주면, 첫번째 이름이 Subject가 됩니다.
인증서 복사하기
1
2
3
| Set-Location -Path "cert:\LocalMachine\My"
$OldCert = (Get-ChildItem -Path E42DBC3B3F2771990A9B3E35D0C3C422779DACD7)
New-SelfSignedCertificate -CloneCert $OldCert
|
S/MIME 커스텀 인증서 만들기
1
2
3
4
5
6
| New-SelfSignedCertificate -Type Custom `
-Subject "E=patti.fuller@contoso.com,CN=Patti Fuller" `
-TextExtension @("2.5.29.37={text}1.3.6.1.5.5.7.3.4","2.5.29.17={text}email=patti.fuller@contoso.com&upn=pattifuller@contoso.com") `-KeyAlgorithm RSA `
-KeyLength 2048 `
-SmimeCapabilities `
-CertStoreLocation "Cert:\CurrentUser\My"
|
- S/MIME 인증서입니다
- 프로바이더는 지정하지 않으면 ‘Microsoft Software Key Storage Provider’이 됩니다.
- NotAfter 옵션이 없기 때문에 유효기간은 1년입니다.
RSA 알고리즘 인증서
1
2
3
4
5
6
7
| New-SelfSignedCertificate -Type Custom `
-Subject "CN=Patti Fuller,OU=UserAccounts,DC=corp,DC=contoso,DC=com" `
-TextExtension @("2.5.29.37={text}1.3.6.1.5.5.7.3.2","2.5.29.17={text}upn=pattifuller@contoso.com") `
-KeyUsage DigitalSignature `
-KeyAlgorithm RSA `
-KeyLength 2048 `
-CertStoreLocation "Cert:\CurrentUser\My"
|
- 현재 디렉토리가 “Cert:\LocalMachine\My” 이면 인증서가 “Cert:\LocalMachine\My” 에 생성됩니다.
ECDSA 알고리즘 인증서
1
2
3
4
5
6
7
| New-SelfSignedCertificate -Type Custom `
-Subject "CN=Patti Fuller,OU=UserAccounts,DC=corp,DC=contoso,DC=com" `
-TextExtension @("2.5.29.37={text}1.3.6.1.5.5.7.3.2","2.5.29.17={text}upn=pattifuller@contoso.com") `
-KeyUsage DigitalSignature `
-KeyAlgorithm ECDSA_nistP256 `
-CurveExport CurveName `
-CertStoreLocation "Cert:\CurrentUser\My"
|
- RSA대칭키가 아닌 elliptic curve 대칭키를 사용합니다.
- ECDSA는 Elliptic Curve Digital Signature Algorithms 의 약자입니다.
1
2
3
4
5
6
7
8
9
| New-SelfSignedCertificate -Type Custom `
-Provider "Microsoft Platform Crypto Provider" `
-Subject "CN=Patti Fuller" `
-TextExtension @("2.5.29.37={text}1.3.6.1.5.5.7.3.2","2.5.29.17={text}upn=pattifuller@contoso.com") `
-KeyExportPolicy NonExportable `
-KeyUsage DigitalSignature `
-KeyAlgorithm RSA `
-KeyLength 2048 `
-CertStoreLocation "Cert:\CurrentUser\My"
|
- Trusted Platform Module (TPM) 프로바이더를 사용했습니다.
- 프로바이더는 지정하지 않으면 ‘Microsoft Software Key Storage Provider’이 됩니다.
- export할 수 없는 인증서입니다. pfx파일을 만들 수 없습니다.
6개월 기간 한정 인증서
1
2
3
4
5
6
7
8
| New-SelfSignedCertificate -Type Custom `
-Container test* `
-Subject "CN=Patti Fuller" `
-TextExtension @("2.5.29.37={text}1.3.6.1.5.5.7.3.2","2.5.29.17={text}upn=pattifuller@contoso.com") `
-KeyUsage DigitalSignature `
-KeyAlgorithm RSA `
-KeyLength 2048 `
-NotAfter (Get-Date).AddMonths(6)
|
1
2
3
4
5
6
7
| New-SelfSignedCertificate -Type Custom `
-Subject "E=patti.fuller@contoso.com,CN=Patti Fuller" `
-TextExtension @("2.5.29.37={text}1.3.6.1.5.5.7.3.4","2.5.29.17={text}email=patti.fuller@contoso.com&email=pattifuller@contoso.com") `
-KeyAlgorithm RSA `
-KeyLength 2048 `
-SmimeCapabilities `
-CertStoreLocation "Cert:\CurrentUser\My"
|
- email이 두개입니다. 그래서 subject name도 두개가 사용가능합니다
1
2
| New-SelfSignedCertificate -Subject "localhost" `
-TextExtension @("2.5.29.17={text}DNS=localhost&IPAddress=127.0.0.1&IPAddress=::1"
|
pfx 파일 만들기
이 파일은 public key 와 private key 모두를 포함하는 파일 형식입니다. 다른 사람에게 public key를 전달하려면 private key를 전달하면 안되겠죠. 그 때는 Export-Certificate를 사용하여 export 해야 합니다.
모든 개인인증서를 pfx로 export하기
1
2
| $mypwd = ConvertTo-SecureString -String "1234" -Force -AsPlainText
Get-ChildItem -Path cert:\LocalMachine\my | Export-PfxCertificate -FilePath C:\mypfx.pfx -Password $mypwd
|
- 모든 key가 전부 mypfx.pfx에 저장됩니다.
인증서 하나만 pfx로 export하기
1
2
3
4
5
6
| $mypwd = ConvertTo-SecureString -String "1234" -Force -AsPlainText
Export-PfxCertificate -Cert cert:\currentuser\my\5F98EBBFE735CDDAE00E33E0FD69050EF9220254 `
-FilePath c:\myexport.pfx `
-ChainOption EndEntityCertOnly `
-NoProperties `
-Password $mypwd
|
- 인증서 chain과 external properties는 export하지 않습니다.
pfx 파일 접근할 수 있는 유저 제한하기
1
2
3
| $a = Get-ChildItem -Path cert:\localMachine\my
Export-PfxCertificate -Cert $a[1] -FilePath C:\myexport.pfx `
-ProtectTo "contoso\billb99", "contoso\johnj99"
|
- 이 인증서를 사용할 수 있는 user를 지정해 버렸습니다. 다른 user는 사용할 수 없습니다.
pfx 파일 접근할 수 있는 유저 제한하기 2
1
2
3
| $a = Get-ChildItem -Path cert:\localMachine\my
$mypwd = ConvertTo-SecureString -String "1234" -Force -AsPlainText
Export-PfxCertificate -Cert $a[1] -FilePath C:\myexport.pfx -ProtectTo "contoso\billb99", "contoso\johnj99" -Password $mypw
|
- user를 지정해 버렸지만, 다른 user들은 암호를 입력하여 사용할 수 있습니다.
pfx의 패스워드 변경하기
1
2
3
| $NewPwd = ConvertTo-SecureString -String "abcd" -Force -AsPlainText
$mypfx = Get-PfxData -FilePath C:\mypfx.pfx -Password $Oldpwd
Export-PfxCertificate -PFXData $mypfx -FilePath C:\mypfx2.pfx -Password $NewPwd
|
다른 포맷으로 export하기
나의 public key를 전달할 때 사용합니다. ‘이 public key로 암호화 해서 주면, 내가 알아서 볼께’ 라고 말하고 전달합니다.
Export-Certificate를 사용하여 export합니다. 사용할 수 있는 Type은 3가지가 있습니다.
- SST: Microsoft serialized certificate store (.sst) 파일포맷입니다.
- 여러개의 인증서를 export할 때는 SST가 디폴트입니다.
- CERT: .cer 파일 포맷입니다.
- 하나만 export할 때는 CERT가 디폴트입니다.
- P7B: PKCS#7 파일 포맷
SST 타입 export하기
1
2
| $cert = Get-ChildItem -Path cert:\CurrentUser\My\EEDEF61D4FF6EDBAAD538BB08CCAADDC3EE28FF
Export-Certificate -Cert $cert -FilePath c:\certs\user.sst -Type SST
|
또는
1
| Get-ChildItem -Path cert:\CurrentUser\my | Export-Certificate -FilePath c:\certs\allcerts.sst -Type SST
|
- SST 포맷은 openssl에서 취급할 수 없습니다.
CER 타입 export하기
1
2
| $cert = Get-ChildItem -Path cert:\CurrentUser\My\EEDEF61D4FF6EDBAAD538BB08CCAADDC3EE28FF
Export-Certificate -Cert $cert -FilePath c:\certs\user.cer
|
- 하나만 export할 때는 CERT가 디폴트입니다.
PKCS#7 타입 export하기
1
2
| $cert = Get-ChildItem -Path cert:\CurrentUser\My\EEDEF61D4FF6EDBAAD538BB08CCAADDC3EE28FF
Export-Certificate -Cert $cert -FilePath c:\certs\user.p7b -Type p7b
|
PFX 파일 읽기
.pfx 파일을 읽을 때는 Get-PfxData 명령을 사용합니다.
읽기
1
2
| $mypwd = ConvertTo-SecureString -String "1234" -Force -AsPlainText
$mypfx = Get-PfxData -FilePath C:\mypfx.pfx -Password $mypwd
|
읽어서 새 패스워드로 저장하기
1
2
3
| $NewPwd = ConvertTo-SecureString -String "abcd" -Force -AsPlainText
$mypfx = Get-PfxData -FilePath C:\mypfx.pfx -Password $OldPwd
Export-PfxCertificate -PfxData $mypfx -FilePath C:\mypfx.pfx -Password $NewPwd -Force
|
인증서 교체하기
Switch-Certificate 명령어를 사용합니다.
교체하기 1
1
2
| Switch-Certificate -OldCert cert:\LocalMachine\My\E42DBC3B3F2771990A9B3E35D0C3C422779DACD7 `
-NewCert cert:\LocalMachine\My\4A346B4385F139CA843912D358D765AB8DEE9FD4
|
교체하기 2
1
2
3
4
| Set-Location -Path cert:\LocalMachine\My
$oldCert = Get-ChildItem -Path E42DBC3B3F2771990A9B3E35D0C3C422779DACD7
$newCert = Get-ChildItem -Path 4A346B4385F139CA843912D358D765AB8DEE9FD4
Switch-Certificate -OldCert $oldCert -NewCert $newCert -NotifyOnly
|
Import하기
파일에서 store로 import하기
Cer 파일에서 store로
Import-Certificate 커맨드를 사용합니다.
1
| Import-Certificate -FilePath "C:\Users\xyz\Desktop\BackupCert.Cer" -CertStoreLocation cert:\CurrentUser\Root
|
1
2
| Set-Location -Path cert:\CurrentUser\My
Import-Certificate -Filepath "C:\files\intermediate.cert"
|
1
| Import-Certificate -FilePath "C:\Users\Xyz\Desktop\BackupCert.Cer" -CertStoreLocation Cert:\LocalMachine\Root
|
PFX 파일에서 store로
Import-PfxCertificate 커맨드를 사용합니다.
1
2
| $mypwd = Get-Credential -UserName 'Enter password below' -Message 'Enter password below'
Import-PfxCertificate -FilePath C:\mypfx.pfx -CertStoreLocation Cert:\LocalMachine\My -Password $mypwd.Password
|
1
| Get-ChildItem -Path c:\mypfx\my.pfx | Import-PfxCertificate -CertStoreLocation Cert:\CurrentUser\My -Exportable
|
1
2
| Set-Location -Path cert:\localMachine\my
Import-PfxCertificate -FilePath c:\mypfx.pfx
|
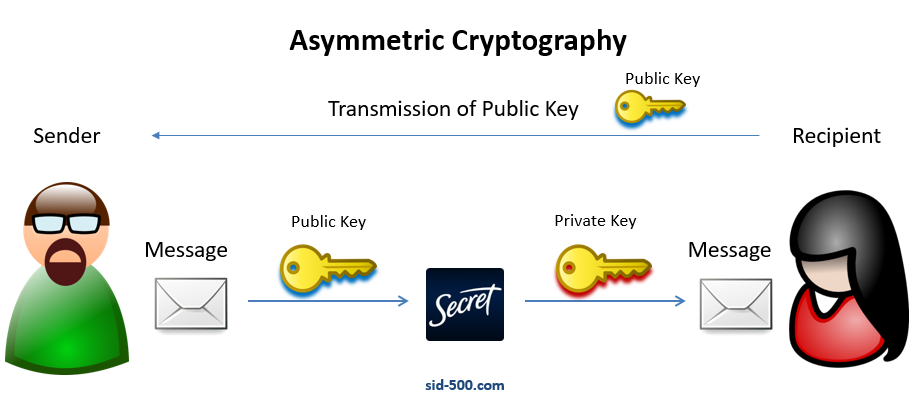
대칭키로 문서 암호화 하기
- 암호화 하려면 보려는 사람의 public key가 필요합니다.
- 그 사람의 public key로 잠궈서 보내면
- 그 사람은 자기 private key로 열어서 봅니다.
그림으로 설명하면 다음과 같습니다.
문서 암호화용 인증서 만들기
1
2
3
4
| New-SelfSignedCertificate -DnsName tkiminfo `
-CertStoreLocation "Cert:\CurrentUser\My" `
-KeyUsage KeyEncipherment,DataEncipherment, KeyAgreement `
-Type DocumentEncryptionCert
|
1
| Get-Childitem -Path Cert:\CurrentUser\My -DocumentEncryptionCert
|
인코딩은 Protect-CmsMessage 커맨드를 사용합니다.
1
| "This is a secret message" | Protect-CmsMessage -To cn=tkiminfo -OutFile C:\Temp\secret.txt
|
디코딩은 Unprotect-CmsMessage 커맨드를 사용합니다.
1
| Unprotect-CmsMessage -Path C:\Temp\secret.txt
|
PFX to PEM
포맷을 바꾸는 작업입니다. certutil로 할까요?
certutil cert -inform input-format -outform output-format -in input-file -out output-file
openssl 커맨드로 할까요?
openssl pkcs12 -in filename.pfx -out cert.pem -nodes
openssl 커맨드가 나온 김에, public key를 빼고 private key만 pem으로 저장하기
openssl pkcs12 -in filename.pfx -nocerts -out key.pem
public key만 pem으로 옮겨볼까요
openssl pkcs12 -in filename.pfx -clcerts -nokeys -out cert.pem
암호화된 perblic key에서 암호를 제거하는 것도 있습니다
openssl rsa -in key.pem -out server.key
crt 파일을 pem 으로 바꾸려면 중간에 der 포맷을 한 번 거쳐야 합니다.
openssl x509 -in input.crt -out input.der -outform DER
openssl x509 -in input.der -inform DER -out output.pem -outform PEM
마치며
이상으로 powershell로 인증서를 다루는 방법을 간단하게 살펴보았습니다. 다음에는
- openssl 커맨드와 함께 사용하는 방법도 살펴보면 좋겠습니다.
- jdk 에도 keytool 이라는 유틸리티를 제공합니다.
- python에도 pyOpenSSL 패키지가 있습니다.
레퍼런스